Looking for an easy way to create (and maintain) a full backup of your Windows 11 or Windows 10 computer? In this tutorial, we’ll learn how to set up a full Windows 11 or Windows 10 backup without any technical knowledge, where to store it, and how to ensure that it is always up to date.
Windows 11 / Windows 10 itself includes a basic backup software, that covers the essentials – your documents, pictures, and some of your user files. Make no mistake: having even properly backed up is far better than having no backup at all. So if the main goal is to use a free tool, Windows 11 / Windows 10 Backup is a feasible option. To access it, open Start Menu, and type in the word “Backup” (without quotes). Click on the “Backup Settings” option in search results. This will get you to the built-in Windows backup wizard.
This guide, however, is focused on an easy, automatic and, most of all, complete backup. Not just files, and not just once it a while. We want to cover everything, at all times.
The product we will be using here is Zinstall FullBack Pro. Here is how to use it to setup a full backup of your Windows 11 or Windows 10:
Click here to get a free trial, and make a full backup of your Windows 11 or Windows 10
Once FullBack starts to run, it performs a complete backup of your entire computer, including programs, settings, accounts, profiles, email, favorites, documents, photos, and all files.
Once that backup is complete, FullBack keeps it up to date, by backing up any changes made to your computer. To save storage space, those backups are incremental, i.e. only the actual changes are stored in your backup – without unnecessary data.
You do not need to manage backup schedules and do not need to remember to make a backup (who can remember this stuff?). It’s all automatic, and always up to date.
Of course, the real reason you have a backup is the restore part. How do you restore a single file that you’ve misplaced? And how do you restore everything, including program files, if your computer crashes? Read on to find out.
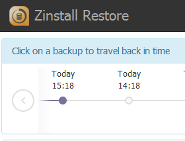
So you were working on an important document, and now it’s gone. Fear not – that’s exactly why you have set up an automatic backup of your entire Windows 11 or Windows 10! Here is what you do:

That’s it – your file is back, safe and sound.
This is something you can only do if you have used Zinstall FullBack. It can actually restore all the stuff from your backed up computer (programs, settings, files, emails, accounts, password, favorites, documents, pictures, music, etc.) onto a completely different computer and completely different Windows. Even if you’ve backed up a Windows 10 32bit Dell, and your replacement PC is a Windows 11 64bit HP, Zinstall will still restore everything you’ve got.

To do that, install Zinstall FullBack on the replacement computer. Open your original backup, and follow the prompts for complete restore. When finished, just restart the computer, and you’ll see all the programs, settings and files from your crashed computer.
Backup Windows 11 or Windows 10 to a USB drive (external hard drive / backup drive): the simplest way to store your backup is to keep it on a USB drive connected to the computer. USB external hard drives are cheap, have lots of storage space and are available in any store. All you need to do is connect the drive to your Windows 11 or Windows 10 computer, and run Zinstall FullBack. It will detect a USB drive automatically and start using it as the backup destination (see instructions below).
A USB external hard drive is generally the cheapest and simplest option for your backup.
Backup Windows 11 or Windows 10 to a Network drive (personal Cloud / Home Server / SAN / NAS): for more advanced users, a network drive may be a more convenient option. Similar to a USB drive, it offers a large amount of storage on the cheap. Its major advantage over a USB drive is that a network drive is not physically connected to the computer. You don’t have to have a physical device plugged in, and will never forget to connect it. To set a network drive as the destination for Zinstall FullBack, you just select it in Settings – see below.
Backup Windows 11 or Windows 10 to Cloud storage (Dropbox / OneDrive / Amazon S3): the next step from a network drive is Cloud storage. Its major advantage, from the backup perspective, is that Cloud storage is by definition off-site. This means that if disaster strikes, a house burns down, gets flooded etc. – Cloud storage still survives and will still be available to restore from. The disadvantage is that Cloud storage tends to be slow (especially for large volumes of data, such as a backup), and expensive.
Other storage options: additional storage options may include a smaller SD card or a USB stick connected to the computer (if you don’t have a lot of files to backup), dedicated backup media devices, etc. You can contact us for questions on those!
If you want to go for an even more comprehensive protection, a good rule to follow is the 3-2-1 rule of backups: always have 3 copies of your data, stored in 2 locations, 1 of them off-site.
These days, this extra safe approach means having a local backup (e.g. to backup Windows 11 or Windows 10 to a USB hard drive) and a Cloud backup (e.g. backup Windows 11 or Windows 10 to Cloud), and keep both up to date. Luckily, FullBack Pro allows you to comply with the 3-2-1 rule by adding another backup target, independent of your original backup.
This way, you can keep two separate backups of your Windows 11 or Windows 10 system, one local, and one on the Cloud. In total, you have 3 copies of your data, in 2 locations (your home / office and the Cloud), 1 of them off-site (in your Cloud storage).
Another important benefit of using this kind of hybrid backup approach (on-premise + off-premise) is speed. In most recovery scenarios, your local backup is alive and well (as opposed to situations when you must have an off-site location, such as fires, floods etc.) It is much faster to restore from local storage than from the Cloud; having a local backup will allow you to be even more efficient in your restores, without sacrificing the resilience you get with off-site Cloud backup.
There are dozens of different backup solutions for Windows 11 or Windows 10, all of them with their merits. We believe that the approach outlined in this guide provides the optimal combination of a easy setup (no technical skills required), and an exceptional backup performance and reliability.
You can literally set up a full backup of your Windows 11 or Windows 10 computer in 5 minutes, and basically forget about it after that.
The next time you’ll have to think about your backup is when you lose a file, or when your computer crashes. When that happens, you’ll thank yourself for spending those 5 minutes on getting a great backup for your Windows 11 or Windows 10.